


Post Form Collection - Pionite Decortive Surfaces
Fax/E-Mail in your blueprint/Drawing and we can provide a Quote
ON SITE QUOTES ONLY - or Bring/Fax/E-Mail in your blueprint/Drawing and we can provide a Quote
| Post Form Collection |
|
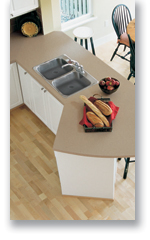
Built - in Value
MANY OPTIONS AVAILABLE TO CHOOSE FROM. CUSTOMIZE A COUNTER TO YOUR SPECIFICATIONS.
|

 |
Pionite Decortive Surfaces: |
 |
| Solid Colors: |
 |
 |
| Woodgrains: |
 |
 |
| Abstracts: |
 |
 |
 |
 |
 |
| Finish Options: |
 |
|
Take a look at the many ways Pionite products can work to enhance the design of any healthcare facility or even your home. |
 |
|
1) High Pressure Laminate (HPL). A high-quality decorative laminate with the durability to preform in demanding locations. 2) ThermoFused melamine (TFM). A rich palette of colors in woodgrains, solids and natural stone to complement or enhance your enviroment. 3) DecoCor thick phenolic core laminate ideal for the workstations and partitions. 4) ChemGuard chemical-resistant laminate. A chemical resistant laminate that offers protection throughout its entire thickness. 5) FRL Fiber Reinforced Laminate. Class A fire rated for flame spread and smoke development with high impact strength 6) FRP Fiberglass Reinforced Plastic. An extremely durable wall and ceiling panel that is moisture, mildew and chemical resistant. |
 Samples: Samples: |
| Price: $ 5.00 2x3" each includes Shipping |
| Ordering samples has never been easier, or quicker! Simply select your sample from the list below, enter the right specifications and click on Add to Cart. |
| * Please present receipt for sample purchase to The Renovation Store Ltd. upon purchase of the counter and you will receive a $5.00 rebate. |
 |
 |
 |
 |
Custom Profiles Available:
 |
 |
 |
| Self Edge | Maple Edge Bevel Profile | Oak Edge Bevel Profile |
 |
 |
 |
| Bevel Edge Maple Insert | Solid Surface Edge | Bevel Profile |
Also Available:- Undermount sinks, Faucets, - Built in Appliances, Kitchen Cabinets
| How to Measure Your Countertop |
|
To use the proper measuring instructions, please determine whether you have a post form or a custom flat lay countertop. If you have a post form (integral backsplash and rounded nose) counter top please follow the instructions for measuring post form counter tops. If you have a counter top which is custom flat lay please follow the instructions for measuring flat lay countertop(s). Measuring for Post Formed CountertopsThis section is divided into two sections:
Measuring Existing Countertops
Step 1
Step 2
Bar or peninsula counters are a standard size of 27 5/8 but can be custom made to fit a specific size requirement. Step 3
Step 4
|

 Important reminder. The depth of kitchen tops and vanity tops will differ. Countertops can be made to specific sizes but there are industry standards. Kitchen counters are a standard size of 25 1⁄2” overall depth with a backsplash height of 2 7/8”. Vanity counters are a standard size of 22 1⁄2 overal depth with a backsplash height of 3 1/8”
 To measure for diagonal corner counter tops, measure point A and point B and point C and point D. Remember to measure to the wall, including the depth of the backsplash. Also ensure that you’ve measured points 1 to 2, 3 to 4, 5 to 6 and 2 to 7. Refer to the diagram to help the measuring instructions
 For counters that meet in the corner, to help with the installation process measure the squareness of the walls. At the point where the two walls meet, measure out to 3 feet on one wall and make a mark. On the opposite wall measure out to 4 feet and make a mark. Then, measure the cross distance between the two wall p


